|
Introduction Stuff
Why post a follow-up article on changing the Win2K boot logo? There are
several reasons, with the primary being a result of Service Pack 2. When SP2
was released some changes were made that affected the way Windows File
Protection behaved. The registry changes outlined in our earlier article,
that would disable Windows File Protection, no longer work after applying
Service Pack 2. This follow-up article will address this minor obstacle, and
pose a much easier and safer way to change the Win2K Boot Logo whether you're
running SP1 or SP2.
Even though we covered this in the first article, we must mention the whole
disclaimer thing again.
Disclaimer: LittleWhiteDog.Com does NOT accept any
responsibility for ANY data loss if you attempt this procedure on your own,
or with the assitance of trained professional (such as your children). This
information is for educational and informational purposes only! Use at your
own risk!
The Tools And The Overview
The only tools you are going to need to get the job done is Resource
Hacker and some kind of image editing tool such as PhotoShop (not
free) or Irfanview
(free)
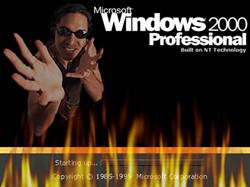
Sometimes it's easier to understand what you're doing after you've seen the
'big picture'. When Windows 2000 boots, a bitmap image is
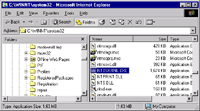
displayed, this image is stored in a file called NTOSKRNL.EXE which is
typically found here: C:WINNTSYSTEM32NTOSKRNL.EXE. Notice I said
typcially? When you install Windows 2000 it will ask you which drive and
which directory you would like to install - for the duration of this article
we are going to assume you chose the default options and installed Win2K onto
your C: drive into the default directory WINNT. Back to the 'big
picture', the following is a broad overview of the steps we'll be
preforming in this article:
- Make a copy of NTOSKRNL.EXE
named KERNEL01.EXE
- Creating a .BMP file that is
640x480 with 16 colors
- Use Resource Hacker to
import the modified bitmap image into KERNEL01.EXE
- Modify the BOOT.INI file,
adding an option to choose KERNEL01.EXE instead of NTOSKRNL.EXE
Baby Steps
We've looked at the 'big picture', now it's time to outline those
steps in detail. It might look like a lot of work, but it should only take
you about 5 or 10 minutes on your first attempt.
Step 1. Make a copy of
C:WINNTSYSTEM32NTOSKRNL.EXE called KERNEL01.EXE and place it in the
C:WINNTSYSTEM32 folder.
Step 2. Download and unzip Resource
Hacker. Once it is unzipped, launch 'ResHacker.exe'.
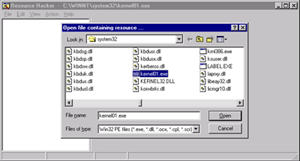
Step 3. Click 'File', then 'Open', and browse to
the C:WinNTSystem32 directory. Open the file we just created in the first
step called KERNEL01.EXE
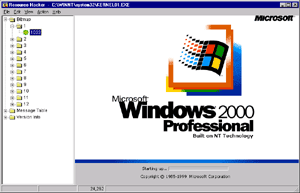
Step 4. On the left-hand side of the screen, double-click on the word
'Bitmap' and then the number '1'. Click the icon that
reads '1033' and you should see the Windows 2000 boot logo on the
right side of the screen. The 'Holy Grail' if you will. At this
point, you can minimize Resource Hacker while we prepare our new image.
Step 5. Using any image editor, create a Bitmap image that is 640 x
480 using 16 colors. We've found the easiest way to create an image is to
take a copy the current image and open it with Photoshop and then edit the
top portion. Set the 'mode' to 'indexed colors' and set
the number of colors to 16. Save the file as a BMP file with RLE Compression
enabled and you're all set.
If you would like a 'pre-made' sample image that has been tested,
you can download this
one as an example.
You could also head over to our Boot Logo Gallery
and choose from an array of hundreds of different images (over 500 to be
exact). These gallery images are not in a bitmap format, so you decide to go
this route, make sure you convert them to a 16 color bitmap prior to
proceeding to step 6. Important! Do not deviate from 640x480 and 16
colors or your results may vary! We've tried it with more colors, and all
you'll see is a black screen during the boot sequesnce, in place of the boot
logo.
Step 6. Once you have created the image, save it somewhere on your
drive taking note of its location.
Step 7. From within Resource Hacker, click on 'Action', then
'Replace Bitmap' and a new window will pop-up at this point. Then
click on the 'Open file with new bitmap' button and browse to the
16-color image you just created. It should look similar to the picture on the
right.
Step 8. Once you have selected the file, click on the
'Replace' button and you should return to the 'root' of
Resource Hacker. Just for the hell of it, make sure your change took effect.
It should now look something like this:
Step 9. Once everything looks good, click 'File' then
'Save'.
Step 10. Time for a quick recap of what we've done so far. We've made
a copy of our NTOSKRNL.EXE file and placed it in the C:WINNTSYSTEM32 folder.
The copy was named KERNEL01.EXE and was opened using Resource Hacker. The
bitmap resource image for the boot logo was replaced with our own customized
version, and the file was saved.
|
Un-Modified Version
|
Modified Version
|
Step 11. Conceptually, the next step is to 'tell Win2K to use the
new KERNEL01.EXE file when it boots, instead of it's normal NTOSKRNL.EXE
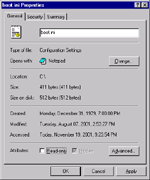
file'. We are going to do this by modifying the BOOT.INI file which is
located in the root of your C: drive. The file is marked hidden and read-only
by default so the first thing we should do is turn off the read-only
attribute. Do this by right clicking on the boot.ini file and then clicking
on properties. Uncheck the read-only box and click OK to apply changes.
NOTE: if you cannot find your boot.ini file, you probably have Windows
Explorer setup so that it cannot view hidden files. Correct this by clicking
on Tools and then Folder Options. Go to the View Tab and toggle the radio
button to Show
Hidden Files and Folders.
Step - 12. We're now ready to open the BOOT.INI file and modify its
contents. I've listed below what my current BOOT.INI file looked like before
any changes were made to it. Yours should be somewhat similar.
|
[boot loader]
timeout=3
default=multi(0)disk(0)rdisk(0)partition(1)WINNT
[operating systems]
multi(0)disk(0)rdisk(0)partition(1)WINNT='Microsoft Windows 2000
Professional' /fastdetect
|
The line we're concerned with is the one under [operating systems]
- this is the line that NTLDR parses to determine the location of the
operating system boot partition. Make a copy of this line and paste is below
the existing one. You should also take a minute and make sure the timeout=X
line under the [boot loader] section has a value other than zero. This is the
number of seconds that the boot menu will be displayed, before it accepts the
default value and continues. The default value will be whatever is listed
first under the [operating system] section.
|
[boot loader]
timeout=3
default=multi(0)disk(0)rdisk(0)partition(1)WINNT
[operating systems]
multi(0)disk(0)rdisk(0)partition(1)WINNT='Microsoft Windows 2000
Professional' /fastdetect
multi(0)disk(0)rdisk(0)partition(1)WINNT='Microsoft Windows 2000
Professional' /fastdetect
|
Modify the line directly below the [operating systems] heading,
adding the following switch to the end: /KERNEL=KERNEL01.EXE
(KERNEL01.EXE is the name of the file we modified in the previous steps) By
doing this, we are telling NTLDR that we want to boot our system using the
specified Kernel file, instead of the default NTOSKRNL file that is used when
the /kernel= option does not exist. You should also change the description on
this line from 'Microsoft Windows 2000 Professional' to something
like 'Microsoft Windows 2000 Hacked Logo' so you know which option
is which. Your boot.ini file should now look like this:
|
[boot loader]
timeout=3
default=multi(0)disk(0)rdisk(0)partition(1)WINNT
[operating systems]
multi(0)disk(0)rdisk(0)partition(1)WINNT='Microsoft Windows 2000
Hacked Logo' /fastdetect /kernel=kernel01.exe
multi(0)disk(0)rdisk(0)partition(1)WINNT='Microsoft Windows 2000
Professional' /fastdetect
|
Before we save this file and move to the
dreaded Step 13, let's recap what we've done here just to make sure
everything is right. We've opened up the boot.ini in edit mode (with
read-only turned off) and have made the following changes: the timeout value
is greater than zero, the default operating system line was copied and
modified to include the /kernel switch pointing to the modified file
from the previous steps. The original default operating system line was not
changed in any way, it was just 'bumped down' a spot to make room
for our new kernel file.
Step 13. There really isn't much to Step 13, just reboot your system.
You should be prompted with a menu for a period of 3 seconds asking you which
boot option you would like: 'The Hacked Logo' or the
'Professional Boring' version. It should default to 'The
Hacked Logo' version after those 3 seconds have expired, since it
resides at the top of the list. However should something go amuck and you've
totally screwed up your 'Hacked Logo' kernel file by using a 16-bit
color bitmap image, instead of a 16 color image, you can still boot your
system up using the original kernel file by choosing the second option on the
menu. That's why is was so important to not make any changes to that line -
it's your software version of an 'Oh Shit' handle.
Wrapping It Up
Hopefully you've grasped what we've done here. In our previous article
we made a copy of the NTOSKRNL file, modified the copy, turned off Windows
File Protection, and then replaced the working version of NTOSKRNL with our
hacked copy. A quite intrusive method of changing the boot logo, with little
room for error. This new method of making a copy of NTOSKRNL, modifying the
copy, and then giving Win2K the option of using this modified kernel file on
boot up, we've eliminated the the need to disable Windows File Protection,
and we've built in a failsafe mode by leaving the original kernel file and
boot option intact.
Those of you who have fully grasped what we've done here, are probably
already thinking of ways to take this process one step further. 'If I
can tell Win2K to use a file called KERNEL01.EXE in addition to the original
NTOSKRNL.EXE file, why can't I make a KERNEL02.EXE and KERNEL03.EXE, add them
to my boot.ini file, and have a wide variety of boot logos on my system?'
The answer is you can! In fact we've taken this concept to the extreme by
creating a little utility called LWDKernel.exe
that will randomly change your boot logo everytime your system boots. For
more information about this utility along with a download link, head on over
to this thread in
our forums.
Hopefully this will be the last article we'll write on the subject of
changing Windows 2000 Boot Logo's. We've come a long way since we published
our first
article on the subject. The forum thread on this topic has been
replied to over 1300 times, and has been read over 83,000 times. Not to
mention the Boot
Logo Gallery which currently contains over 540 images created by
some very talented artists. A big thank you goes out to everyone who's
contributed to the cause!
|