|


 |  |

| Aeronautica | Comunicatii | Drept | Informatica | Nutritie | Sociologie |
| Tehnica mecanica |
Powerpoint
|
|
Qdidactic » stiinta & tehnica » informatica » powerpoint Microsoft PowerPoint |
Microsoft PowerPoint
Microsoft PowerPoint
What is PowerPoint?
PowerPoint is a complete
presentation graphics package. It gives you everything you need to produce a
professional-looking presentation. PowerPoint offers word processing,
outlining, drawing, graphing, and presentation management tools- all designed
to be easy to use and learn.
The following gives you a quick overview of what you can do in PowerPoint:
When you create a presentation using PowerPoint, the presentation is made up of a series of slides. The slides that you create using PowerPoint can also be presented as overhead transparencies or 35mm slides.
In addition to slides, you can print audience handouts, outlines, and speaker's notes.
You can format all the slides in a presentation using the powerful Slide Master which will be covered in the tutorial.
You can keep your entire presentation in a single file- all your slides, speaker's notes, and audience handouts.
You can import what you have created in other Microsoft products, such as Word and Excel into any of your slides.
Now that you know what features PowerPoint offers it's time to learn how to work in PowerPoint.
Getting Started and Working in PowerPoint
This tutorial is unlike
the others you have seen in class. The PowerPoint tutorial will be text based.
To get the most out of this tutorial it is best to run PowerPoint, so that you
can experiment with the concepts that are mentioned in the tutorial.
![]() Find
and open PowerPoint.
Find
and open PowerPoint.
When the Tip of the day dialog box appears,
![]() Read
it and click on the OK button.
Read
it and click on the OK button.
The following PowerPoint dialog box should appear, asking you how you
want to create your new presentation.
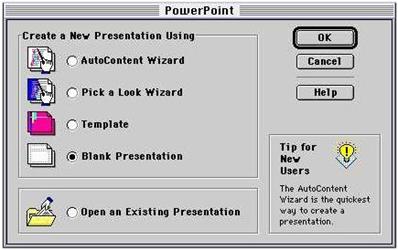
Here is a brief description of the options under the Create a New
Presentation Using title.
AutoContent Wizard- takes you through the creation of a simple presentation step by step.
Pick a Look Wizard- this wizard helps you make choices on how your presentation will look.
Template- PowerPoint provides 160 templates that you can choose from. The templates are created by professional artists and offer design choices in black and white as well as in color.
Blank Presentation- this option allows you to select slides and format them individually.
![]() Select
Blank Presentation and click on the OK button.
Select
Blank Presentation and click on the OK button.
![]() In
the New Slide dialog box select the Title Slide option.
In
the New Slide dialog box select the Title Slide option.
Your screen should look as follows:
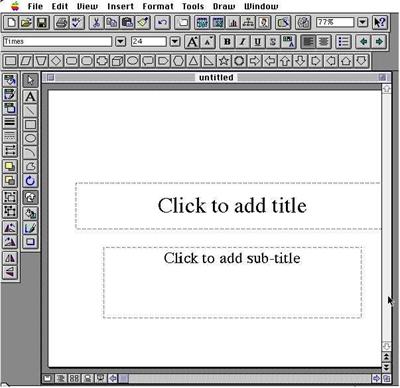
This is your title slide
you can enter the title and sub-title here. Note that if your toolbars are not
visible, choose Toolbars from the View menu and make your
selections.
![]() Experiment
with your title slide by entering in text, changing the color of the text,
changing the font size etc.
Experiment
with your title slide by entering in text, changing the color of the text,
changing the font size etc.
Now that you have been introduced to a slide, it is time to learn about
PowerPoint's different Views.
Understanding PowerPoint Views
PowerPoint gives you four
views in which you create and organize your presentation. As you create a
presentation, you can switch among the four views as you work.
The four PowerPoint views are:
Slide View-
To be in Slide view you click on the following button located in the
bottom-left hand corner of any slide: (![]() ).
).
The Slide view shows a single slide. In Slide view, you work on one slide at at
time. Here, you can type your slide title and body, add other text to the
slide, draw shapes, add clip art, choose a color scheme, make a graph, etc. In
Slide view, you have access to all the tools on the Tool Palette as well as
buttons on the Toolbar.
Outline View-
To be in Outline view you click on the following button located in the
bottom-left hand corner of any slide: (![]() ).
).
The Outline view shows all the titles and body text in your presentation. In
Outline view, you can move slides around within your presentation and also edit
your text.
![]() Click
on the Outline view button (
Click
on the Outline view button (![]() ),
to view your title slide in this view.
),
to view your title slide in this view.
Slide Sorter View-
To be in Slide Sorter view you click on the following button located in the
bottom-left hand corner of any slide: (![]() ).
).
The Slide Sorter view shows you a minature of each slide in your presentation.
You can drag slides around on the screen to reposition them in this view. You
can also select and copy multiple slides should you want to use them in other
presentations.
![]() Click
on the Slide Sorter view button (
Click
on the Slide Sorter view button (![]() ),
to view your title slide in this view.
),
to view your title slide in this view.
Notes View-
To be in Notes view you click on the following button located in the
bottom-left hand corner of any slide: (![]() ).
).
The Notes view lets you create speaker's notes. Each page corresponds to a
slide in your presentation and includes a reduce image of the slide. You can
draw and type in Notes view the way you can in Slide View.
![]() Click
on the Notes view button (
Click
on the Notes view button (![]() ),
to view your title slide in this view.
),
to view your title slide in this view.
You now know all of PowerPoint's views. There is one more button located in the
bottom- left hand corner of any slide:(![]() ).
This is the Slide Show button. The Slide Show button runs a slide show
starting from the currently selected slide.
).
This is the Slide Show button. The Slide Show button runs a slide show
starting from the currently selected slide.
Now that you know all of PowerPoint's views it is time to learn how to work
within a slide. In general, presentations will be based on a Master Slide.
The next topic in the tutorial will focus on understanding PowerPoint Masters.
Understanding PowerPoint Slide Masters and Templates
Slide Masters
A PowerPointSlide
Master contains objects that you want to appear on each slide in your
presentation. With a Slide Master, you only have to create an item once and
PowerPoint will automatically include them on every slide. Some things are set
up by PowerPoint (for example; place for slide title and text) so you don't
have to create them each time. If you want to add additional items to a master,
you can at any time. The Slide Master has boxes already set up for the slide
title and text. They're called the Master Title and the Master
Body object. The format of these objects determines the way your text
will look on each slide. You can always make slides look different from the
Slide Master, but a Slide Master gives you a consistent starting point.
The Slide Master is flexible. You can move objects around, add art, add
headings or labels, change colors and fonts.
As you create a slide, you have the option of using or not using the elements
from the Slide Master. To change the entire presentation, you simply change the
format of the Slide Master. PowerPoint will then change all your slides
accordingly.
PowerPoint Templates
PowerPoint also offers
templates. A template is a presentation containing PowerPoint masters and a
color scheme. PowerPoint offers 160 pre-designed templates to help you get
started quickly. Applying a template to a presentation you are creating means
the design work is already done for you.
You can apply a template when you are just starting a presentation, or you can
create a presentation and apply the template later.
Now that you have learned about PowerPoint masters and templates it is time to
learn create a slide.
Creating a Master Slide
![]() With
PowerPoint running, choose Master from the View menu, then select
Slide Master from the Master submenu.
With
PowerPoint running, choose Master from the View menu, then select
Slide Master from the Master submenu.
This is your slide master. Let's start with formatting the Master title style.
![]() Click
on the Title Area for AutoLayouts.
Click
on the Title Area for AutoLayouts.
![]() Choose
Font from the Format menu, and change the font style, color, and
size of the text.
Choose
Font from the Format menu, and change the font style, color, and
size of the text.
This formatting will be the same on each new slides Title Area .
To observe this,
![]() Click
on the New Slide button (
Click
on the New Slide button (![]() )
located in the bottom right corner of the screen.
)
located in the bottom right corner of the screen.
![]() Choose
a slide that contains a title area.
Choose
a slide that contains a title area.
![]() Click
in the title area of your new slide and type some text.
Click
in the title area of your new slide and type some text.
The text format should duplicate that of the Master Slide.
Let's format the bullets that will appear on each slide, by formatting them on
the Master Slide.
![]() Choose
Slide Master from the View menu.
Choose
Slide Master from the View menu.
![]() Highlight
the first line of text in the Object Area for Autolayouts.
Highlight
the first line of text in the Object Area for Autolayouts.
![]() Choose
Bullet from the format menu and pick a different style bullet.
Choose
Bullet from the format menu and pick a different style bullet.
You now know how to format items on the Master Slide.
In addition to formatting text and bullets you can also format the following:
Slide Background
Slide ColorScheme
Experiment with these on
your own.
PowerPoint also has a number of features you can use to display your slides
when you are giving a slide show. This will be the last topic covered in this
tutorial.
Transitions and Build Slides
When you display your
presentation electronically as a slide show, the slides take up the full
screen. All the tools, menus, and other screen elements are hidden so as not to
detract from your show. Your computer becomes the equivalent of a slide
projector.
PowerPoint offers a number of features you can use when you run your slide
show:
You can use special effects, such as transitions and builds, to add variety.
You can practice giving your presentation and set automated timings for your slides to match your rehearsal times.
In this part of the tutorial we will discuss transitions and builds.
Build Slide
A build slide is a slide
that starts with the first major bullet point and shows more major bullet
points as the presentation proceeds. You decide whether you want to dim
previous points on the slide as new points appear and what effect you want to
use when the bullet points appear (for instance, bullet points can fly in from
the right, left, top, or bottom).
Transitions
Transititions moves one slide off the screen and brings the next one on. Fading from black and dissolving from one slide to another are two examples of transitions. You have a choice of transitions for each slide, plus you can vary the speed of each transition.
Adding Transitions to Your Slide Show
A transition refers to the
way one slide moves off the screen and the next slide appears. When you set
your transitions, you can also set how long you want each slide to appear on
the screen.
To set transitions and timing:
![]() Choose
Transition from the Tools menu.
Choose
Transition from the Tools menu.
![]() Choose
the transition from the drop-down list.
Choose
the transition from the drop-down list.
![]() Click
how fast you want the transition to take place- Slow, Medium, or Fast.
Click
how fast you want the transition to take place- Slow, Medium, or Fast.
![]() Decide
how you want to advance to the next slide and, if need be, set the timing.
Decide
how you want to advance to the next slide and, if need be, set the timing.
If you want the slide to advance automatically, you need to decide how long the
slide should appear on-screen before advancing to the next slide:
Only on Mouse Click- The slide advances manually with a mouse click.
Automatically After [N] Seconds- Type the number of seconds you want the
slide on the screen. During the presentation, the slide advances automatically
when the time is up.
![]() Click
the OK button.
Click
the OK button.
Creating a Build Slide
A build slide is one that
seems to build on itself, showing progressively more information as the
presentation proceeds.
To create a build slide:
To start you must have a slide which contains bullets.
![]() Choose
Build from the Tools menu.
Choose
Build from the Tools menu.
![]() Choose
the options you want to use in building the slide.
Choose
the options you want to use in building the slide.
![]() Click
on the OK button.
Click
on the OK button.
You have successfully completed the PowerPoint tutorial!
Description: Listed below are many common tasks that you would use while working in PowerPoint. To find out how to perform these tasks click on the appropriate link below and it will guide you in a step by step fashion by providing detailed directions and screen shots to visually assist you.
Starting From Scratch One way to start your presentation is to start from scratch. In this way you are starting out with a blank presentation. You can then design your own background choices. You would not be using a template design. To start a presentation from scratch follow these steps:
Open up PowerPoint.
A PowerPoint dialog box will open.
Click on the radio button that says blank presentation.
Click OK.
Your new presentation will open. Choose your slide layout and click OK.
You can now start working on your presentation or start designing the background that you would like to use for this show.
Open Existing Presentations To continue working on a previous presentation you would have to open that file instead of starting a new one. To open up an existing file follow these steps:
Open up PowerPoint.
A PowerPoint dialog box will open.
Click on the radio button existing presentation.
If your presentation is listed in the box you can just double click on it to open it up. If they don't show up in the box just leave more files selected and click on OK.
The Open dialog box would then open. Choose your file and click on Open.
You can then continue working on your file.
|
Using A Template You can use the built in templates that PowerPoint provides to begin your presentation. In this way you will have a consistent design that goes together. The template will include your background as well as font styles, colors and sizes for your placeholders, as well as selected bullets that match the template. There are many templates built in and you can choose the one that best suits your needs. To begin your presentation using a template follow these steps: Open up PowerPoint. A PowerPoint dialog box will open.
Click on the radio button that says Design Template. Click OK. The new presentation dialog box will open. You can click on the different file names for the template designs and you will see a preview window that displays what the template looks like. You can look under the Presentation tab, Presentation Designs tab as well as Design Templates tab. If you previously had Office 97 you may have an Office 97 templates tab that you can look through as well. Double click on the design that you like and your presentation will open with that template choice.
|
Adding New Slides While working on your presentation you will often need to add new slides. To add a new slide to your presentation follow these steps:
While in slide
view or normal view click on the new slide icon from the standard toolbar. ![]()
or
Go to Insert on the menu bar and choose new slide or click on Control + M. You can also click on the drop down from the common tasks menu bar found on the formatting toolbar and choose new slide.
The Slide layout dialog box will open.
Choose the slide layout that best fits the slide you are adding.
Click on OK.
Your new slide will be added.
PowerPoint Views There are six different views found in PowerPoint. The default is the Normal view. The six views and what they are best used for are show below.
|
Normal View |
Tri Pane View. You can view notes, outline and your slide all at once. |
|
Slide View |
Best used when working on your slides individually. The majority of the screen space is for your slide for easier viewing. |
|
Slide Sorter View |
Allows you to view all of your slides at once. Great for moving slides around and deleting or just looking at the flow of your show. |
|
Outline View |
Best for working on adding your text for the show. Work in an outline format. |
|
Notes Page View |
View a small image of the slide along with space to write your speaker notes. |
|
Slide Show |
This is for previewing and actually running the show. The slides will be full screen. |
To change your views follow these steps:
Click on the
view button on the bottom left hand side of the PowerPoint screen.![]()
or
Go to View on the menu bar and choose the best view to suit your needs.
Deleting Slides There are a few ways to delete slides. If you want to delete one slide and you are in normal or slide view follow these steps:
With the slide open go to Edit on the menu bar and choose delete slide.
If you have a few slides to delete then you may be better off to delete them in slide sorter view. Get in slide sorter view and follow these steps:
Click on the slide you want to delete and hold the shift key down while you click on the other slides you want to delete.
Click on the delete or backspace key and the slides will be deleted.
Moving Slides You may find that as you or your students are working on your presentation you may need to move the slide order around. To best do this you should be in the slide sorter view. Once in that view follow these steps:
Click on the slide that you want to move and hold the mouse button down while you move the slide to the desired location. You will see a vertical bar as you move the slides. When the bar is in front of the slide where you want to position your slide release the mouse button and the slides will be moved to the new position.
|
Applying Design Templates If you are working on your presentation and at any given time you decide that you would like to apply a design template or change the one you are currently using follow these steps: Right click on the slide you are working on in either the slide view or normal view. Click on Apply Design Template. ( You can also just click on the down arrow for common tasks and choose Apply Design Template.) Click on the design you would like to use and click on the Apply button. Your new design will be applied.
|
|
Adding Backgrounds You can create your own backgrounds when working in FrontPage. If you start a new presentation by choosing blank when you start, you can build and design your own background instead of using the design templates. You can add a solid color, gradient, texture, pattern, or even a picture for your background. To design your own background follow these steps: Open up PowerPoint and choose blank presentation. Right click on the slide and choose Background or go to Format on the menu bar and choose Background. The background dialog box will open. Follow the set of directions that pertain to the type of background you want to add: color, gradient, texture, pattern or picture.
Color Click on the down arrow and choose one of the colors shown or click on More Colors and pick the color you would like for your background. Click on OK. Click on Apply to apply to the current slide you are on or Apply to All to apply to all of your slides. Your new color will be added. Gradient Click on the down arrow and choose Fill Effects. Make sure you are on the Gradient tab. You can choose One Color, Two Color or Present. Present are previously created gradients that you can choose from. If you choose two color Click on the down arrow to make your two color choices. Click on the radio button next to shading styles. Under Variants, click on the design that you like for your gradient. Click on OK. Click on Apply to apply to the current slide you are on or Apply to All to apply to all of your slides. Your new gradient color will be added.
Texture Click on the down arrow and choose Fill Effects. Click on the Texture tab. Click on one of the textures designs that are listed there. If you want to bring in your own texture from a file that you have saved you can click on Other Texture and go out and find the file that you want to use. Click on OK. Click on Apply to apply to the current slide you are on or Apply to All to apply to all of your slides. Your new texture will be added.
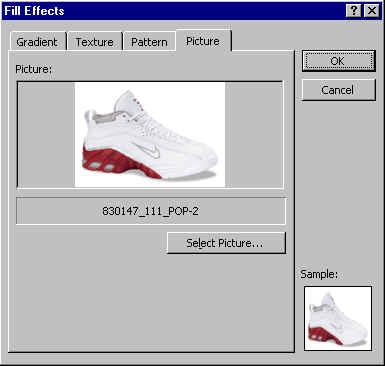
Picture Click on the down arrow and choose Fill Effects. Click on the Picture tab. Click on select picture and go find the graphic file that you want to use. Click on OK. Click on Apply to apply to the current slide you are on or Apply to All to apply to all of your slides. Your new background with a graphic will be added.
|

Working With Text
Adding Textboxes One way to add text to your slide is to add a text box. You will then have to format the text to the desired type. To add a text box follow these steps:
Click on the text box icon found on the drawing
toolbar. ![]()
Click and drag the box in the desired location.
Type your text.
Click outside of the box and the lines will disappear.
To edit the text just click inside the box and make your corrections just as you would with a word processor.
Adding Placeholders A quick way to add your text and have it automatically formatted is to add a placeholder. These work great for your titles and subtitles. That way each slide will have a consistency in formatting. To add a placeholder follow these steps:
Click on the down arrow for Common Tasks and choose Slide layout. You can also right click on your slide and choose slide layout.
Click on Apply or Reapply.
The placeholder will appear. Click inside and start typing. The placeholder's formatting is preset if you are using a design template.
|
Formatting Text There are a couple of different ways to format your text once you type it in. You can either use the menu bar or the Formatting toolbar. To format your text to change things like font, color, style, size etc. follow these steps: Select your text by either highlighting it or click on the diagonal lines that surround the text so that it turns to little dots. When you do this any formatting you add will effect everything in the box. Using the formatting toolbar choose the
formatting that you want to add from the standard toolbar. There are buttons
and drop downs for font, size, style, and alignment. You can also go to Format on the menu bar and choose font. The font dialog box will open. Make your changes within the dialog box. Click OK and your changes will occur.
|
Working With Graphics
|
Adding Images From Clipart One task you will be performing often would be to add images to your page. You can bring in images that you have saved or you can use Microsoft's Clip Gallery which has thousands of images, photos, and animations. It is also searchable making it easier to find the type of image you want to use. To use the clip gallery follow these steps: Go to Insert on the menu bar and choose Picture
and then Clip Art or you can click on the Clip Gallery icon from the drawing
toolbar. The Clip Gallery will open. Either click on the category you want to look through or type in a keyword for what you are looking for and hit enter. The images will appear. When you find the one you like click on it and click on the insert icon. You can at this point add additional images or if you are done close the clip gallery window and your image will be placed on your slide.
|
Adding Images From File You can add your own images that you have saved or have access to. To add images from file follow these steps:
In slide view go to Insert on the menu bar and then Picture and click on From File.
Choose the picture that you have saved.
Click on Insert.
You can then resize your image if you need to and move it to the appropriate location.

Adding Animated Gifs One way to spruce up your presentations is to add animated gifs. This is new to PowerPoint 2000. Animated gifs did not work in previous versions. Adding this type of file is really no different than adding an image. You will not see the animation while in the regular view. You have to be in the slide show to see them.
Go to Insert on the menu bar and choose clipart if you want to find animated gifs that are in the Clip Gallery. They are listed under the motion tab. You can also choose from file and find your own animated gif.
Get into the slide show view and you can see what the animation will look like.

|
Adding Transitions You can add transitions that occur between your slides. As your show moves from slide to slide you have an animated transition between them. It is a nice effect to add to your show. It is easiest if you add your transitions while in the slide sorter view. You can add the same transition to each slide or you can pick different transitions. To add transitions follow these steps: Get in the slide sorter view. Click on the Slide Transition button from the
slide sorter toolbar. The slide transition dialog box will open. Click on the down arrow and choose the type of transition you want to use. You will see a little preview in the effect window. Choose if you want the transition to be slow, medium, or fast. If you want a sound attributed to the transition then click on the down arrow next to sound and choose the sound you want to use. If you want your transition to run when you click the mouse then put a check in 'On mouse click'. If you want the animation to occur automatically put a check in that box and put a number for the amount of seconds you want to wait until the transition occurs. Click on Apply to All if you want that same transition to occur after each slide or Apply if you just want to add it to the one slide.
|
Adding Animations You can take any of the images in your presentation and animate them. That is what really brings your presentation to life. There are many different types of animations to choose from. To animate an image follow these steps:
Right click on your image and choose custom animation or click on your image and go to Slide Show form the menu bar and choose custom animation.
Click on the down arrow next to entry animation and sound. Choose one of the animation types. Another drop down may become active where you can further define the action the image will take.
Click on the order and timing tab.
Leave on mouse click if you want to click to have your animation occur or click on the radio button for automatically and put in the number of seconds you want to wait before the action occurs.
Click on OK.
Get into the Slide Show mode and check out your animation.
|
Adding Sounds There are many different ways to add sound to your PowerPoint presentation. You can add sound effects to images, add sound icons you can click on or even just have your music play throughout the whole show. Your sound clips should be in either the wav or mid format. There are a few other less common file types you can use. You can also use a CD and play that while you are giving your presentation. To insert sound into your presentation follow these steps: Go to Insert on the menu bar and choose Movies and Sounds and then sound from gallery if you want to pick a sound file from Microsoft's Gallery or choose from file if you have a saved sound file you want to use. Find the sound file that you have access to and double click on it. A dialog box will open up and ask you if you want your sound to play throughout the whole show. Click Yes if you want it to play automatically and no if you do not. An icon will be inserted into your presentation. Get into Slide Show mode and your sound should automatically start if you choose that or click if you did not and your sound should play.
|

Finishing Up
Spelling One very important step in working with PowerPoint is to make sure you perform a spell check on your presentation. You should also proofread it as well. It can be quite embarrassing to find mistakes while you are presenting. To run a spell check follow these steps:
With your presentation open click on the spelling
icon from the standard toolbar. ![]()
You can also go to Tools Spelling or hit F7. A spell check will be run on your show.
When typing in PowerPoint if you get a red squiggly line under your text that is an indication that your word may be incorrectly spelled. You can right click on the word and choose one of the words listed or choose ignore if the word was spelled correctly.
Running The Show To run your show, check it out, or when it is for the real presentation follow these steps:
If you want to start at the beginning of your presentation then go to Slide Show from the menu bar and choose View Show or hit F5.
If you want to
begin looking at your show starting at the slide you currently have open in
normal or slide view then click on the slide show icon from the views icon. ![]()
|
Using The Pen Feature The pen is a neat tool that you can use while in your presentation. You can draw on your slide for effect. You can write on your slide. To activate and use the pen follow these steps: While in the slide show mode either right click on the slide and choose Pointer Options and then pen or you can click on the icon on the bottom left of the screen and choose Pointer Options and then pen. You can also use the keyboard command of Control +P to activate the pen and Control + A will bring the arrow back. You can then draw on the slide. To chance the pen color right click on the slide and choose Pointer Options then pen color and click on the color of your choice. To erase the pen from the slide while in the slide show view hit E on the keyboard and it will erase the pen.
|

Saving You should periodically save your show as you are working. I like to start out by saving my show and then hitting the save icon every 5 or ten minutes as I work. To save your presentation follow these steps:
If it is the first time you are saving your show go to File on the menu bar and choose Save As.
Choose the location for saving your file and give your file a name.
Click on Save.
If you have
saved your show before you can click on the save icon from the standard toolbar
of to to File Save.![]()
Saving As A Web Page One really cool thing you can do with your PowerPoint files is to post them on the web. The process with which the program is able to keep the integrity of the show and change it to html code it amazing. The shows look great online. You can bring your presentation with you by just having Internet Access. You can also post your presentations so students and parents can have access to them anytime, anywhere. To saver your show as a web page follow these steps:
Open up your presentation.
Go to File on the menu bar and choose Save As A Web Page.
The Save As dialog box will open.
|
|
|
Click on the down arrow next to Save in and point to the area of your web server where you have access.
Click on the Publish button.
The Publish as a Web Page dialog box will open.
This is where you will make selections customizing how your presentation will be displayed. Under Publish What complete presentation if you want to publish all or choose the slides you want to publish. Leave the check next to display speaker notes if you want them to be available.
Under
Browser Support make the choice of Microsoft
Internet Explorer 4.0 or later ( high fidelity) if you want your presentation
to be viewed only in Internet Explorer. This takes full advantage of the
presentation and allows you to view in full screen. This method of saving looks
the best.
Down under file name type in the path where you want to save (on your web server) or click on the Browse button to browse to it.
Click on the Web Options button.
The web options dialog box opens.
Click on the drop down next to the Colors box and choose the colors you want for the text with and background of the Outline.
Make your choice of options under the tabs presented in the Web Options dialog box. (I typically leave the defaults set).
Click on OK.
Click on Publish.
Once you save this it created two files. If you called your show summerday then after saving the file you would have created a folder called summerday_files and an htm file called summerday.htm. If you are using FrontPage you can import these files into your web. Create a link to the summerday.htm file. When your visitors click on this link it will open up the PowerPoint show.
Your show should open up in a browser to show you what it would look like.
|
Printing You can print out your presentation in different format. All of the variations of the printing types can be found in the print dialog box. Listed in the table below are the types of printing you can do. To print your presentation follow these steps: Go to File on the menu bar and choose Print. The Print dialog box will appear. It may look different than the one displayed here. The dialog box varies depending on your particular type of printer. You should have basically the same options however. Choose what you want to print, all slides, particular slides, or the current slide. Enter the number of copies you want to print. Check if you want them collated. Choose what you want to print: slides, handouts, notes pages, or outline view. Click on OK.
|
||||||||||
| Contact |- ia legatura cu noi -| | |
| Adauga document |- pune-ti documente online -| | |
| Termeni & conditii de utilizare |- politica de cookies si de confidentialitate -| | |
| Copyright © |- 2024 - Toate drepturile rezervate -| |
|
|
||||||||||||||||||||||||
|
||||||||||||||||||||||||
|
||||||||||||||||||||||||
Documente online pe aceeasi tema | ||||||||||||||||||||||||
|
| ||||||||||||||||||||||||
|
||||||||||||||||||||||||
|
|
||||||||||||||||||||||||